Completing a Postponed Project
Published | Last updated
🔗Completing the Source Code
During the formative years of my interest in computing I explored several dialects of BASIC, including QBasic which had a popular following online. Through various community resources and documentation, my programming skill developed, confidence in my ability grew, and I sought ever more complex personal projects to tackle. One such project was BA-CREATURES, a virtual ecosystem simulation. I uploaded an early attempt to The QBasic Station on 23 April 2007.
I originally got this idea after reading an old book on Java Programming. I worked with the idea of having virtual pets, and then it spawned into a virtual ecosystem idea. So now here's BA-CREATURES. Right now it's just 5 circles, "creatures," moving around on the screen, but I plan on updating this often.
Despite my intention, I was unable to complete the project at the time due to my inexperience as a programmer, so I postponed it indefinitely. I revisited the project much later in 2021 and finally, having gained the necessary experience and grown significantly as a software engineer, I started over from scratch and did complete it on September 16, 2021.
However, while the source code was complete, I experienced my program only through a virtual machine emulation. I wondered what it would have been like to experience BA-CREATURES in 2007 as I originally had intended.
🔗Procuring the Hardware
I decided to acquire computer hardware similar to the kind with which I interacted during that era. The Dell OptiPlex line of computers were popular in my high school during that period of time, so I sought out a model that I could have encountered during my school days.
On eBay, I purchased a Dell OptiPlex GX260 desktop and Dell E773C CRT computer monitor.[^1] The desktop I purchased lacked a hard drive, so I also purchased a contemporary Western Digital WD800BB hard disk drive.
Incidentally, the Dell OptiPlex GX260 desktop arrived with visible signs of capacitor failure, such as a crusty orange electrolyte discharge on top of one capacitor and bulging capacitors (a known issue with this OptiPlex series). I worried that the system would not boot in this condition, but I was able to reach a BIOS configuration menu when I turned on the desktop, so cautiously I continued onward.
Although the Dell OptiPlex GX260 desktop I purchased did have a floppy disk drive and optical disc drive, I had only a digital backup of Windows XP Professional (Service Pack 2 included)[^2] saved as an ISO image file. Rather than purchase a new stack of blank CD-ROM discs that I am unlikely to use in the future, I decided to leverage a SanDisk Ultra SDCZ48-064G[^3] USB flash drive to boot the Windows XP installation program.
🔗Preparing the USB Flash Device
For a PC, booting from a USB flash drive follows a different procedure[^4] than booting from an optical disc drive. The Windows XP installation ISO image naturally contained an ISO 9660 file system with a Boot Record Volume Descriptor indicating a "El Torito" Bootable CD-ROM Format Specification, which meant it was bootable. However, because the PC BIOS will interpret the image differently if it is presented as a USB flash drive versus an optical disc drive, I could not simply write the ISO image verbatim to my USB flash drive.[^5]
In order to boot the Windows XP installation program from my USB flash drive, I would need to format the drive with a Master Boot Record (MBR), install an appropriate bootloader, and copy over the necessary Windows XP installation files from the ISO image to a readable partition on the drive.
On my Fedora Linux system, I used the
fdisk utility to partition the
USB flash device (/dev/sda).
# <kbd>fdisk /dev/sda</kbd>
I created a new empty MBR (DOS) partition table, defined a single primary
partition encompassing all available space, set the partition's type table entry
to 0c
for W95 FAT32 (LBA)[^6], and enabled the partition's
boot flag[^7].
Disk /dev/sda: 57.3 GiB, 61530439680 bytes, 120176640 sectors
Disk model:  SanDisk 3.2Gen1
Units: sectors of 1 * 512 = 512 bytes
Sector size (logical/physical): 512 bytes / 512 bytes
I/O size (minimum/optimal): 512 bytes / 512 bytes
Disklabel type: dos
Disk identifier: 0xf0383d55

Device     Boot Start       End   Sectors  Size Id Type
/dev/sda1  *     2048 120176639 120174592 57.3G  c W95 FAT32 (LBA)
Next, I formatted the partition using the
mkfs utility to create a
MS-DOS
FAT32 filesystem.
# <kbd>mkfs.fat -F 32 /dev/sda1</kbd>
This allowed me to mount the
partition (/dev/sda1) to the /mnt directory on my system so I could transfer
files over to the USB flash device.
The
boot process of the Windows XP Setup
goes through a number of phases. The relevant installation files are located
under the I386 directory of the Windows XP installation CD. Of note, the
SETUPLDR.BIN
bootloader
seems to look specifically
for a $WIN_NT$.~BT folder at the root level of the booted partition; the
Windows XP Setup program expects to find its installation files within this
folder.
I used the xorriso utility to extract
the necessary files from the Windows XP installation ISO image
(VX2POEM_EN.ISO).
$ <kbd>osirrox -indev VX2POEM_EN.ISO -extract /I386 /mnt/I386</kbd>
Then I created a copy of the I386 directory as $WIN_NT$.~BT[^8], and copied the
NTDETECT.COM and
TXTSETUP.SIF
files as well because they are also expected to exist under the root level of
the booted partition.
$ <kbd>cp -R /mnt/I386 /mnt/\$WIN_NT\$.~BT</kbd>
$ <kbd>cp /mnt/I386/NTDETECT.COM /mnt/</kbd>
$ <kbd>cp /mnt/I386/TXTSETUP.SIF /mnt/</kbd>
Inside the TXTSETUP.SIF file, under the [SetupData] section I added a line
for
SetupSourceDevice
specifying the boot partition (partition1) of my USB flash device
(harddisk1).
--- a/TXTSETUP.SIF
+++ b/TXTSETUP.SIF
@@ -16302,3 +16302,3 @@
 [SetupData]
-
+SetupSourceDevice = \device\harddisk1\partition1
Finally, I installed the GNU GRUB
bootloader to the USB flash device because it
supported BIOS-based machines (i386-pc)
and loading the
Windows XP boot loader (NTLDR).
# <kbd>grub2-install --target=i386-pc --boot-directory=/mnt/boot /dev/sda</kbd>
The last step was to create a
GRUB configuration file
(/mnt/boot/grub2/grub.cfg) with a
menu entry
to
search
for the /$WIN_NT$.~BT/SETUPLDR.BIN file and
load it.
menuentry "Windows XP Professional (Includes Service Pack 2) OEM installation" {
   set setupldr="/\$WIN_NT\$.~BT/SETUPLDR.BIN"
   search --set=root --file $setupldr
   ntldr $setupldr
}
🔗Hitting a Roadblock
I plugged the USB flash drive into the desktop and selected it from the BIOS boot menu. The GRUB menu appeared, so I selected the menu entry I created earlier and loaded the Windows XP Setup program.
The Windows Setup program loaded a number of files and, after some time, attempted to start Windows to load its drivers and begin the installation. Unfortunately, I encountered a blue screen of death (BSOD) thereafter.
A problem has been detected and Windows has been shut down to prevent damage
to your computer.

If this is the first time you've seen this Stop error screen,
restart your computer. If this screen appears again, follow
these steps:

Check for viruses on your computer. Remove any newly installed
hard drives or hard drive controllers. Check your hard drive
to make sure it is properly configured and terminated.
Run CHKDSK /F to check for hard drive corruption, and then
restart your computer.

Technical information:

*** STOP: 0x0000007B (0xF78D2524,0xC0000034,0x00000000,0x00000000)
Stop error 0x0000007B corresponds to the
INACCESSIBLE_BOOT_DEVICE bug check.
As the name implies, Windows is unable to access the boot partition on the USB
flash device.[^9]
One way resolve this problem is to make adjustments to the Windows XP installation files to get Windows to load the necessary USB drivers earlier in its installation process so that they are available when needed. However, I was not inclined to make so many changes to the Windows XP installation files and spend time troubleshooting any further issues I encounter along the way.[^10]
So I considered another way to get around this roadblock. Windows XP should load drivers appropriately to support the IDE hard disk drive, so I should be able to progress if I run the Windows installation from the IDE hard disk device instead.
🔗Preparing the Hard Disk
In order to format the hard disk, I would first need to boot into an appropriate operating system with the necessary tools. Starting with Fedora 31, bootable images for i686 systems were no longer provided, so instead I chose to write GParted Live[^11] to the USB flash device.
After booting into GParted Live on the OptiPlex GX260 desktop, I repeated the steps that I did for preparing the USB flash device on the IDE hard disk. However, I made the hard disk partition only 2 GB in size so that I could install Windows XP on the remainder of the drive.
Disk /dev/sda: 70.52 GiB, 75721927680 bytes, 147894390 sectors
Disk model: WDC WD800BB-55HE
Units: sectors of 1 * 512 = 512 bytes
Sector size (logical/physical): 512 bytes / 512 bytes
I/O size (minimum/optimal): 512 bytes / 512 bytes
Disklabel type: dos
Disk identifier: 0xa24dd20b

Device     Boot Start     End Sectors Size Id Type
/dev/sda1  *     2048 4196351 4194304   2G  c W95 FAT32 (LBA)
Also, I had to adjust the SetupSourceDevice line to specify the hard disk
(harddisk0).
--- a/TXTSETUP.SIF
+++ b/TXTSETUP.SIF
@@ -16302,3 +16302,3 @@
 [SetupData]
-SetupSourceDevice = \device\harddisk1\partition1
+SetupSourceDevice = \device\harddisk0\partition1
I rebooted the desktop and booted from the hard disk. Windows XP Setup started and I was able to progress successfully past the previous BSOD. I continued the Windows installation process, formatting the remaining empty space on the drive as a NTFS partition.
🔗Running the Software
I finshed the Windows installation procedure and at last I was running Windows XP on the OptiPlex GX260 desktop. Windows XP was missing some drivers for the desktop, so I went to the Dell OptiPlex GX260 drivers page and downloaded the latest provided Intel 845G graphics driver (v.6.14.10.4544, A10). I installed the graphics driver and set the display mode to a True Color 1024x768 resolution.
I made one small change to the BA-CREATURES.BAS file. There is a SLEEP 1
line near the end of the game loop that I added to accommodate modern machines
which generally run far faster than when QBasic was designed. I removed this
line to experience BA-CREATURES as it would have been on a contemporary desktop.
diff --git a/BA-CREATURES.BAS b/BA-CREATURES.BAS
index 3e8976a..ad6b984 100644
--- a/BA-CREATURES.BAS
+++ b/BA-CREATURES.BAS
@@ -403,7 +403,5 @@ SUB runSimulation
 		CALL updateCreatures(auto(), numAuto, AUTOTROPH)
 		CALL updateCreatures(herb(), numHerb, HERBIVORE)
 		CALL updateCreatures(carn(), numCarn, CARNIVORE)
-
-		SLEEP 1
 	LOOP
 END SUB
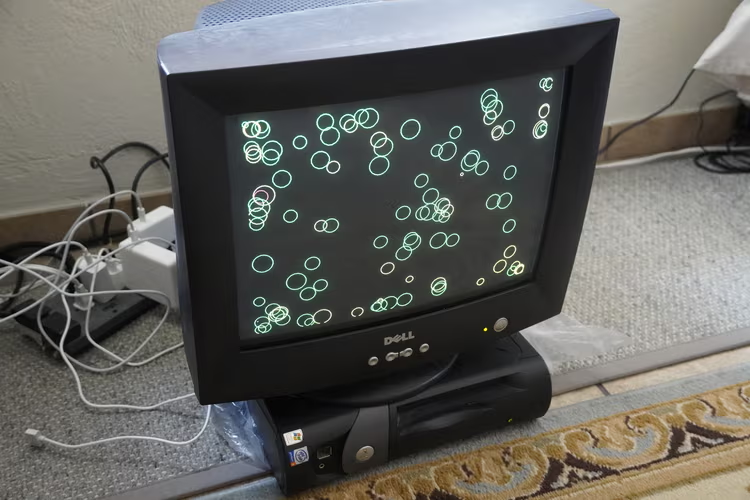
Finally, I opened BA-CREATURES.BAS in QBasic 1.1 and ran it. I entered the
following arbitrary configuration when prompted and started the simulation.
Initial health: 100
Growth rate: 10
Maximum health: 200
Consumption factor: 1
Starvation factor: 1
Wander force: 0.5
Flee force: 1
Chase force: 2
Maximum acceleration: 5
Maximum velocity: 8
Flee sense: 10
Chase sense: 20
Autotrophs: 50
Herbivores: 25
Carnivores: 13
It ran at a modest speed as expected, and slowed down to a crawl as the number of creatures increased, but it did run successfully as intended. I had achieved what I set out to do.
Despite the journey of setting up the prerequiste legacy hardware and software taking much more effort that I had anticipated, I felt statisfication at having brought a personal project from childhood through to completion. It is bittersweet to look back on old projects and think about how they fade away in time, whether physically as with the hardware degradation or just mentally in your mind. I'm glad I looked back on this one.